Harvey Alpha Series Table Saws: Blade & Arbor Washer/Nut Installation Guide
Created by Gabriel Izzo, Modified on Thu, 2 Jul at 3:17 PM by Gabriel Izzo
This article covers complete blade installation instructions for Harvey Alpha Series table saws, including the arbor washer's locating screws — a question that frequently arises during blade changes. Whether you're installing a blade for the first time or swapping to a standard U.S. blade, this guide covers everything in one place.
Applies to all Harvey Alpha Series table saws.
- 24mm wrench — holds the arbor shaft stationary
- 27mm wrench — loosens / tightens the arbor nut
- Metric hex key (Allen wrench) — for removing arbor washer locating screws if needed
- Dual 13/27mm open-end wrench (single wrench, included with saw) — the 27mm end is used on the arbor nut
- Arbor locking pin — locks the arbor shaft in place (replaces the second wrench method used on the HW110S)
- Metric hex key (Allen wrench) — for removing arbor washer locating screws if needed
Disconnect the saw from its power source. Raise the blade to its maximum height to give yourself the best access to the arbor area.
- Insert the 24mm wrench onto the arbor shaft to hold it stationary.
- Use the 27mm wrench to loosen the arbor nut by turning it counterclockwise.
- Remove the arbor nut and flange washer and set them aside.
- Remove the table insert to access the arbor assembly below.
- Raise the arbor to its maximum height and set the blade bevel angle to 0°.
- With one hand, press and hold the arbor locking pin. Slowly rotate the arbor by hand until the pin engages and locks the arbor in place — you will feel it click into position.
- Using the 27mm end of the dual 13/27mm open-end wrench, loosen and remove the arbor nut and arbor flange washer by turning counterclockwise. Set both aside.
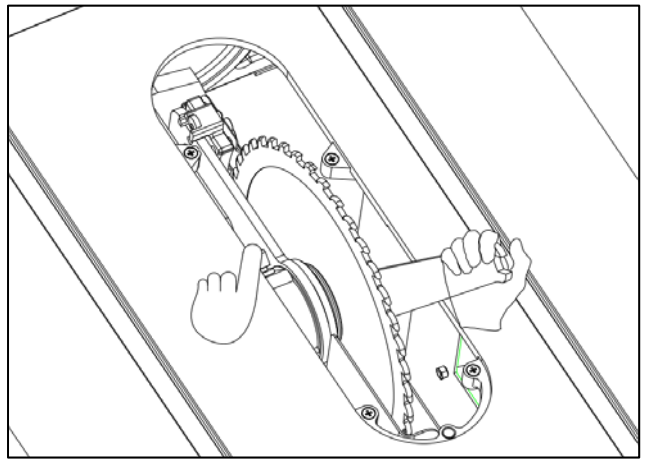
Fig. LC/TC-1 — One hand presses the arbor locking pin while the open-end wrench removes the arbor nut.
Carefully remove the existing blade from the arbor shaft. Handle the blade by its body, not by the teeth. Set it aside on a safe, stable surface.
The arbor washer includes two locating screws — a design carried over from European manufacturing standards. What you do with them depends on the blade you're installing:
Leave the screws in place. The blade's locating holes will seat over the screws, providing enhanced blade stability at high RPM.
Remove the two screws using a metric hex key (Allen wrench) before installing the blade. This allows the blade to seat flush against the flange washer without interference. This is fully acceptable under U.S. safety regulations. Set the screws aside — they can be reinstalled later if switching to a European-style blade.
- Slide the new blade onto the arbor shaft. Confirm the blade is no larger than 10" in diameter with a 5/8" arbor hole.
- Verify that the blade teeth face forward, toward the front of the saw table. Running a blade backwards is a serious safety hazard.
After seating the blade with teeth facing forward, install the arbor flange washer first, then thread the arbor nut onto the arbor threads by hand before tightening with the wrench. Ensure both are fully seated and properly oriented before applying final torque (see Steps 6 & 7).
Correct orientation of the arbor washer is essential. An incorrectly installed washer will not seat properly against the blade, causing vibration or wobble.
Install the arbor washer with the bevel (chamfered face) facing away from the blade. If installed backwards, the washer will not seat correctly against the blade.
Install the arbor nut with the taper facing inward, toward the blade. If the nut is installed with the taper facing the wrong direction, it will not seat correctly — causing the blade to rotate out of round and wobble. This is a serious safety hazard.
- Ensure the nut is properly seated within the flange washer recess before tightening.
- Use the 24mm wrench to hold the arbor shaft and the 27mm wrench to tighten the arbor nut clockwise.
- Ensure the nut is properly seated on the arbor flange washer before tightening.
- Engage the arbor locking pin to hold the arbor stationary, then use the 27mm end of the dual 13/27mm open-end wrench to fully tighten the arbor nut clockwise.
- HW110LC & HW110TC models: Disengage the arbor locking pin after tightening the arbor nut before spinning the blade or reconnecting power.
- Spin the blade by hand — it should rotate freely with no wobble, binding, or lateral play.
- Reinstall the blade guard assembly and confirm it is functioning correctly before reconnecting power.
- Reconnect power and briefly run the saw at no load to verify smooth, vibration-free operation.

Fig. 1 — Correct arbor washer and nut orientation. Washer bevel faces away from the blade; nut taper faces inward toward the blade. If installed backwards, the arbor nut will pinch and warp the blade causing blade wobble.
Harvey Alpha table saws are manufactured to meet international standards, including European safety regulations that require additional securing points for saw blades. The two locating screws are designed to engage matching holes on Harvey Leitz Destroyer blades (German-made), providing enhanced blade stability and safety at high rotational speeds.
If you are using standard U.S.-made saw blades without locating holes, it is fully acceptable under U.S. safety regulations to remove the two screws. Standard U.S. blades seat correctly against the flange washer without them — the screws simply are not needed for non-European-style blades.
The video below demonstrates blade installation on Harvey Alpha Series table saws, including arbor washer and nut orientation.
For questions about blade installation or arbor washer compatibility, please contact our support team or call 888-211-0397.
Was this article helpful?
That’s Great!
Thank you for your feedback
Sorry! We couldn't be helpful
Thank you for your feedback
Feedback sent
We appreciate your effort and will try to fix the article