Turbo T-40 Wood Lathe: Headstock-to-Tailstock Alignment Adjustment

Created by Gabriel Izzo, Modified on Wed, 17 Jun at 4:50 PM by Gabriel Izzo

Harvey Industries · Turbo T-40 Wood Lathe · Adjustment Guide
Headstock-to-Tailstock Alignment Adjustment

If you find that the headstock and tailstock centers are not properly aligned on your T-40 Lathe, the headstock pivot stop may require adjustment. Because the T-40 features a pivoting headstock, proper alignment is critical to ensure accurate turning performance.

The procedure below outlines how to verify alignment and adjust the headstock pivot stop if necessary.

⚠ Safety — Read Before Performing Any Adjustments
Turn the lathe OFF and unplug it from the power source before beginning any maintenance or adjustments. Verify the machine is fully de-energized and cannot be accidentally switched on.
!
Remove all workpieces, faceplates, chucks, drive centers, and tooling from the machine before proceeding.
!
Wear ANSI-approved safety glasses and cut-resistant work gloves when handling sharp tooling or metal components.
!
Ensure the lathe is on a stable surface and cannot shift or move during adjustment. Keep the work area clear of obstructions.
Recommended Tools

For best results, we recommend using a Morse Taper 2MT-to-2MT alignment tool. This style of alignment tool inserts into both the headstock and tailstock simultaneously, providing an accurate and easy-to-read visual reference for center-to-center alignment throughout the adjustment process.

Morse Taper 2MT-to-2MT Alignment Tool — Example
Morse Taper 2MT-to-2MT alignment tool example
BUY
Morse Taper 2MT-to-2MT Alignment Tool
amazon.com — Example reference tool
 
Before You Begin — Verify Headstock Seating

Before adjusting the pivot stop, confirm the headstock is fully rotated back to its locked operating position. In some cases, alignment issues occur simply because the headstock was locked down slightly before reaching its full stop — no pivot stop adjustment is needed in that situation.

1
Loosen the headstock locking mechanism.
2
Rotate the headstock fully back to its home position, ensuring it reaches the mechanical stop completely.
3
Re-tighten the headstock locking mechanism securely and check alignment again.
If alignment is restored after confirming the headstock is fully seated against the stop, no further adjustment is necessary. If alignment is still incorrect, proceed with the pivot stop adjustment below.
Adjusting the Headstock Pivot Stop
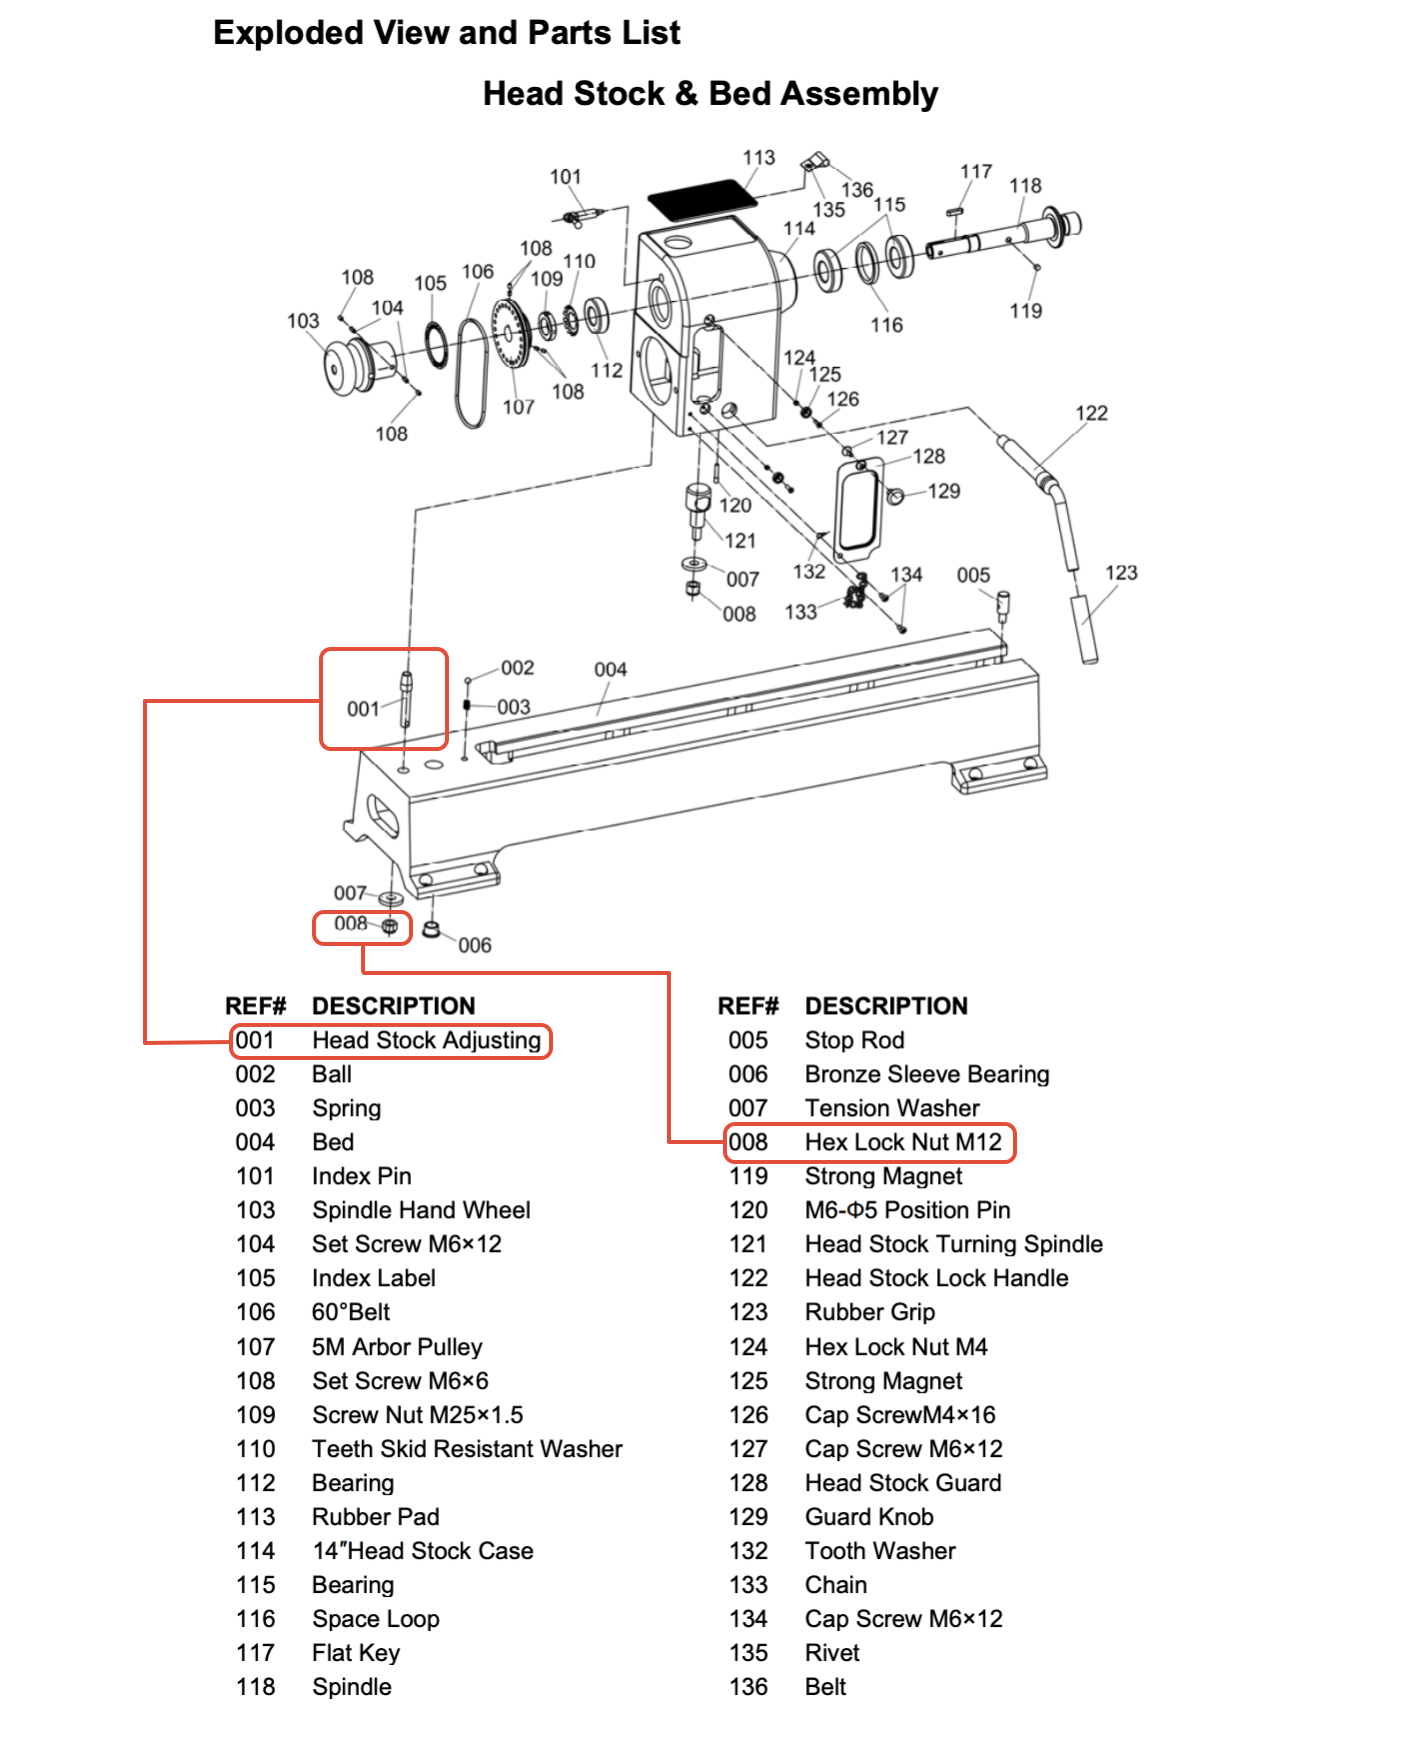
Components: Stop (#001)  ·  Locking Nut (#008) — refer to T-40 parts diagram
1
Install the Alignment Tool
Insert the 2MT alignment tool into the headstock spindle.
Bring the tailstock forward and engage the opposite end of the alignment tool into the tailstock.
Lightly secure the tailstock. The alignment tool will serve as a visual reference throughout the adjustment.
2
Loosen the Locking Nut (#008)
Locate Nut (#008) underneath the lathe bed. Refer to the T-40 exploded parts diagram for component identification.
Loosen the nut enough to allow adjustment of Stop (#001). Do not completely remove the nut.
3
Adjust the Stop (#001)
Rotate or adjust Stop (#001) as needed, using the alignment tool as your reference.
Make small incremental adjustments and recheck alignment after each change.
Continue adjusting until the alignment tool indicates the headstock is properly centered with the tailstock.
Because the T-40 uses a pivoting headstock, even small adjustments to the stop can produce noticeable changes in alignment. Always adjust gradually and verify frequently.
4
Tighten the Locking Nut (#008)
Once proper alignment is achieved, hold Stop (#001) firmly in position.
Tighten Nut (#008) securely to lock the adjustment in place. Verify that the stop has not shifted during tightening.
Verify Alignment
Complete all three checks before returning the lathe to service
Check 1 — Alignment Tool Verification

Confirm the alignment tool remains centered between the headstock and tailstock with no visible deviation.
Check 2 — Live Center Verification
Remove the alignment tool and install a live center in the tailstock.
Bring the live center up to a reference point and verify it meets the headstock center accurately.
Check 3 — Center-to-Center Verification
Install a drive center in the headstock and a live center in the tailstock.
Bring the centers together and confirm the points meet precisely with no offset.
If the centers align correctly across all three checks, the adjustment is complete and the lathe is ready to return to service.
Reference Diagram
T-40 Headstock Pivot Stop — Component Reference
T-40 headstock pivot stop adjustment diagram
Additional Notes

Because the T-40 uses a pivoting headstock design, slight movement in the stop adjustment can produce noticeable changes in alignment. Always make small adjustments and verify alignment after each change. If alignment cannot be achieved after completing this procedure, contact Harvey support for additional troubleshooting assistance.

i

If alignment cannot be restored after completing this procedure, please contact our support team or call 888-211-0397.

Was this article helpful?

That’s Great!

Thank you for your feedback

Sorry! We couldn't be helpful

Thank you for your feedback

Let us know how can we improve this article!

Select at least one of the reasons
CAPTCHA verification is required.

Feedback sent

We appreciate your effort and will try to fix the article